From your free trial to your first job on the road. Every step says where to click, what to fill in and why it matters. No technical knowledge needed, and inside the CRM a guided setup takes you through the same steps.
Most companies finish the essentials in about an hourSee pricing
Before you start
Have these to hand
You can add everything later, but having it ready makes the set-up quicker.
Your company details
Company name, office email and phone, address, and the postcode of your main depot.
Your logo
A PNG or SVG file. You can also pick your brand colour and the CRM builds a theme from it.
Your team
The name and work email of each person who will use the CRM, and what each of them does.
Your vehicles
The number plates. The CRM looks up the make, tax and MOT from DVLA for you.
Your drivers
Each driver’s name, email address, mobile number, and driving licence number and expiry date. All four are needed to add a driver, and the email gives them their own login for the driver app.
Optional connections
Your email server details, a WhatsApp Business number, and a Google Maps key if you want them. Each can wait.
Step by step
Your company, set up in 22 steps
Do the steps in order the first time. Steps 1 to 7 set up your company, 8 to 12 connect email, WhatsApp, notifications, maps, tracking and licence checks, 13 to 17 add your vehicles, drivers, checks and documents, 18 to 20 run your first job and follow it, and 21 and 22 set up your accounts and any leases. Inside the CRM, the Setup Guide under Help takes a new company through the same steps in the same order and ticks each one off as it is done.
1
Step 1 of 22
Start your free trial
Website › Start free trial
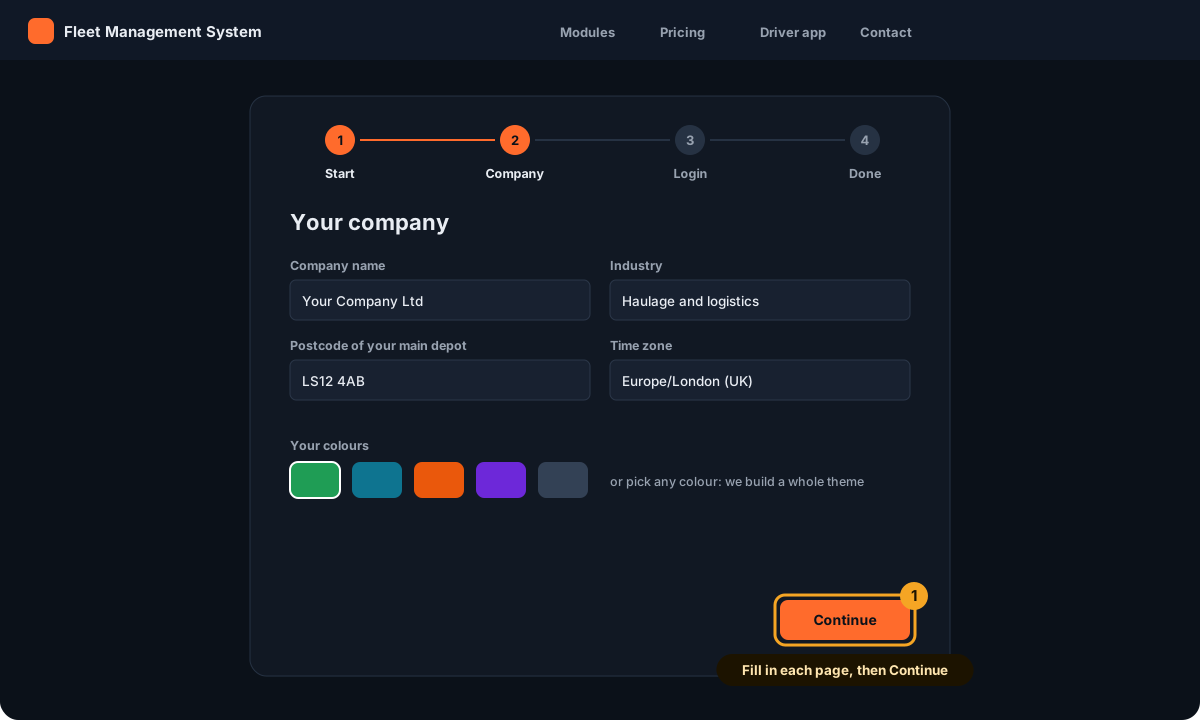
Press Start free trial at the top of this website. The sign-up takes about three minutes and needs no card for the trial.
It asks for your company, your colours and your own login, then creates your CRM straight away.
Say how many vehicles you run
Enter your company name, industry and the postcode of your main depot
Check the time zone: it is filled in from your computer
Pick a colour theme, or any brand colour
Enter your name, mobile, work email and a password
The Start free trial wizard: your company, your colours and your admin loginBack to the steps2
Step 2 of 22
Sign in to your CRM
The Log in link at the top of the website
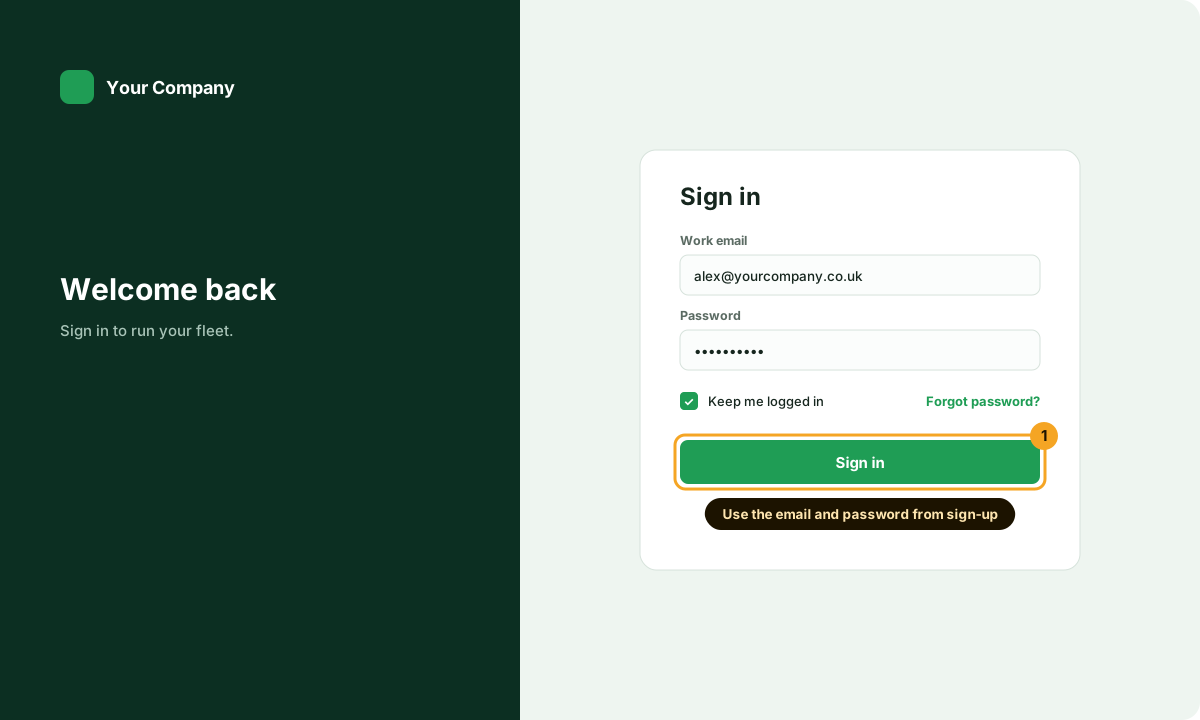
When the sign-up finishes, press Log in to open your CRM. Sign in with the work email and password you chose.
Tick Keep me logged in on your own computer so you are not asked every day. The first time you open the dashboard, the CRM’s own Setup Guide opens: the same steps as this page, ticked off as you do them.
Bookmark the sign-in page
Use Forgot password? to have a reset link emailed to you
Find the guided setup again under Help › Setup Guide
The CRM sign-in page with Keep me logged in and Forgot passwordBack to the steps3
Step 3 of 22
Check your company details
Company Setup › Company Profile › Company details
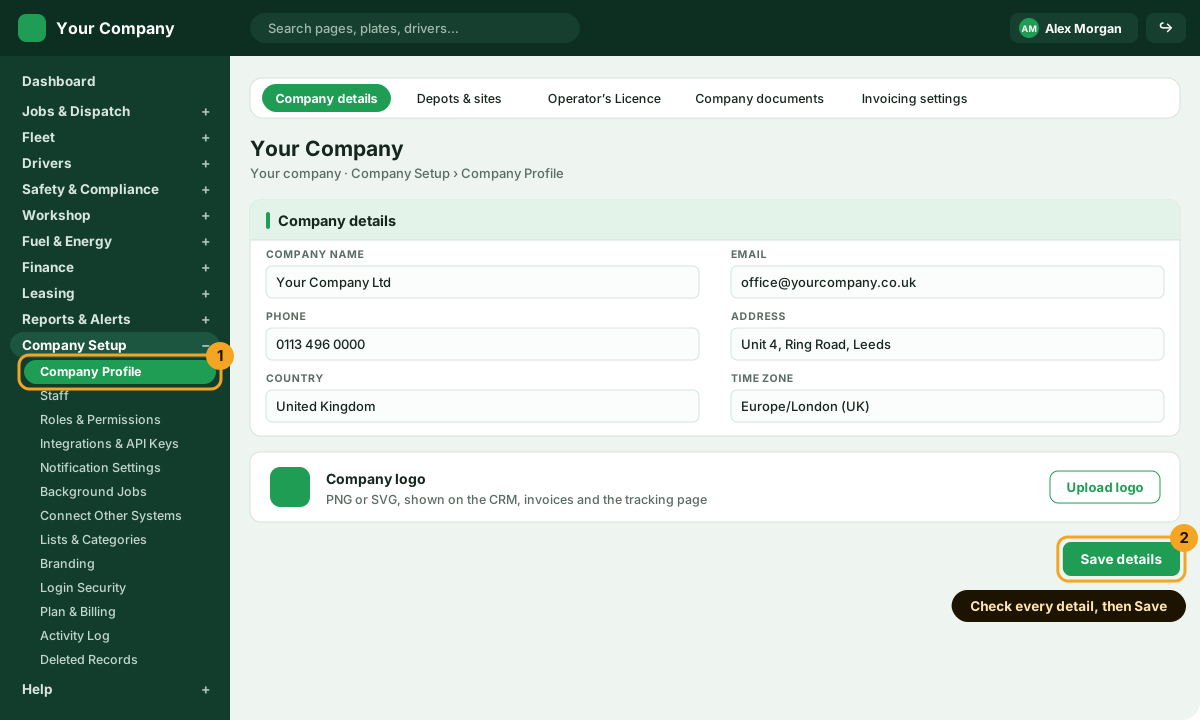
Open Company Setup in the menu on the left and choose Company Profile. Check your company name, office email, phone, address and country, and upload your logo.
The time zone matters: every date and time your team, your drivers and your customers see follows it.
Company name, email, phone and address
Country and time zone
Your logo, shown on the CRM, invoices and the customer tracking page
Company Setup, Company Profile: the company details form with the logo upload and Save detailsBack to the steps4
Step 4 of 22
Add your colours and logo
Company Setup › Branding
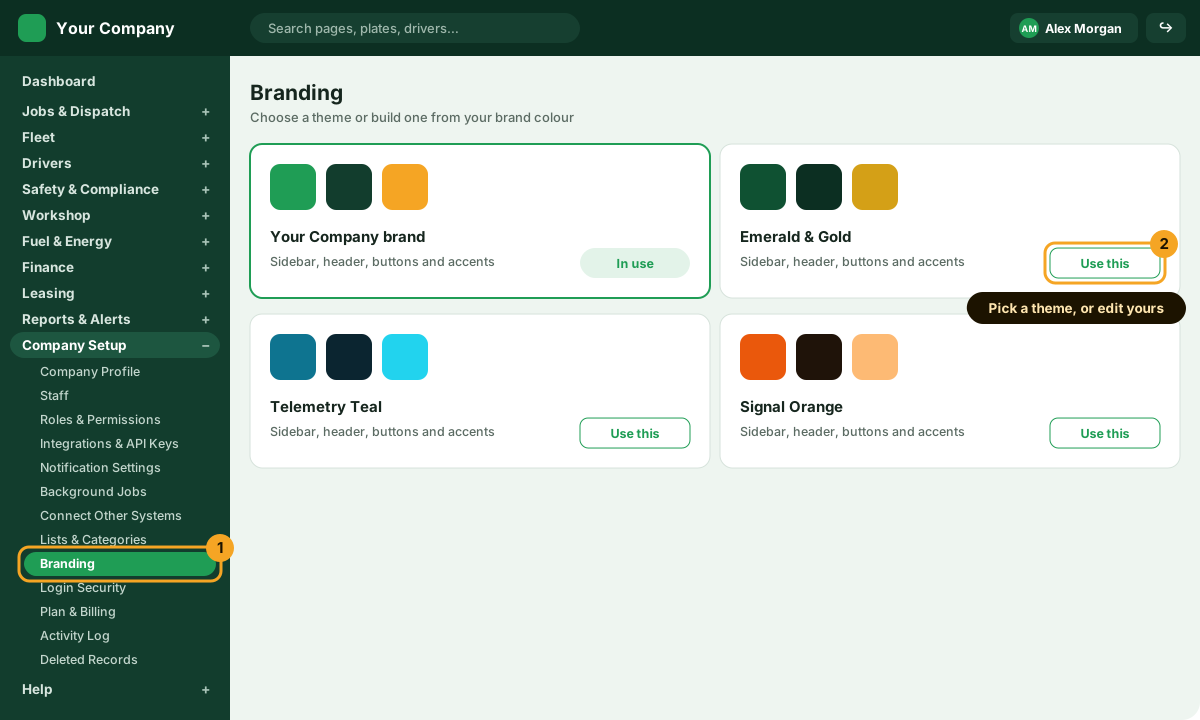
Make the CRM look like your business. Choose one of the ready-made themes, or keep the theme the sign-up built from your brand colour and adjust it.
The theme colours the sidebar, the header, the buttons and the accents for everyone in your company.
Press Use this on a theme to switch to it
Edit your own brand theme to fine-tune each colour
Company Setup, Branding: theme cards with Use thisBack to the steps5
Step 5 of 22
Add your depots and sites
Company Setup › Company Profile › Depots & sites
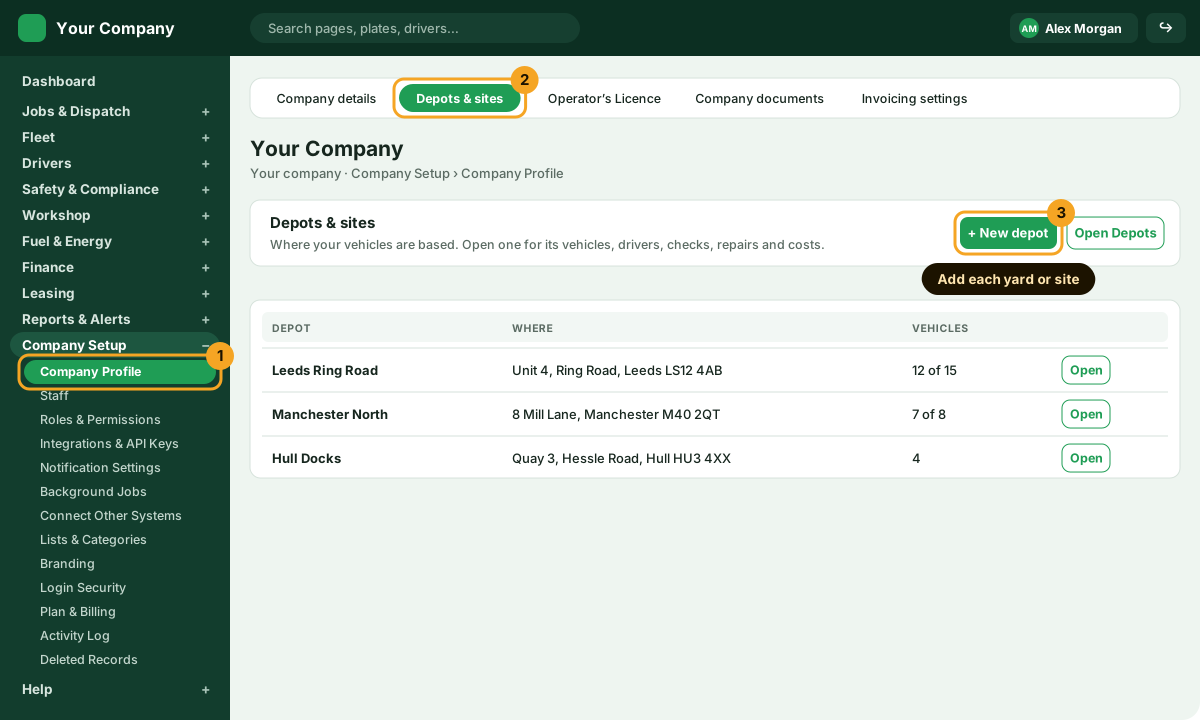
Add each yard, depot or site your vehicles are based at, on the Depots & sites tab of your Company Profile. Type the postcode to find the address.
Route planning starts vehicles from their depot, and costs, checks and repairs can be compared depot by depot. Once your depots are in, new vehicles and drivers are given a depot by themselves: the only one you have, or the one nearest the driver’s postcode.
Open Company Setup › Company Profile and choose the Depots & sites tab
Press + New depot, or Open Depots for the full list
Give it a name, an address and a contact, and say how many vehicles it can hold if that matters to you
Company Setup, Company Profile, Depots and sites tab: the depot list with the New depot and Open Depots buttonsBack to the steps6
Step 6 of 22
Add your staff and give each person a role
Company Setup › Staff
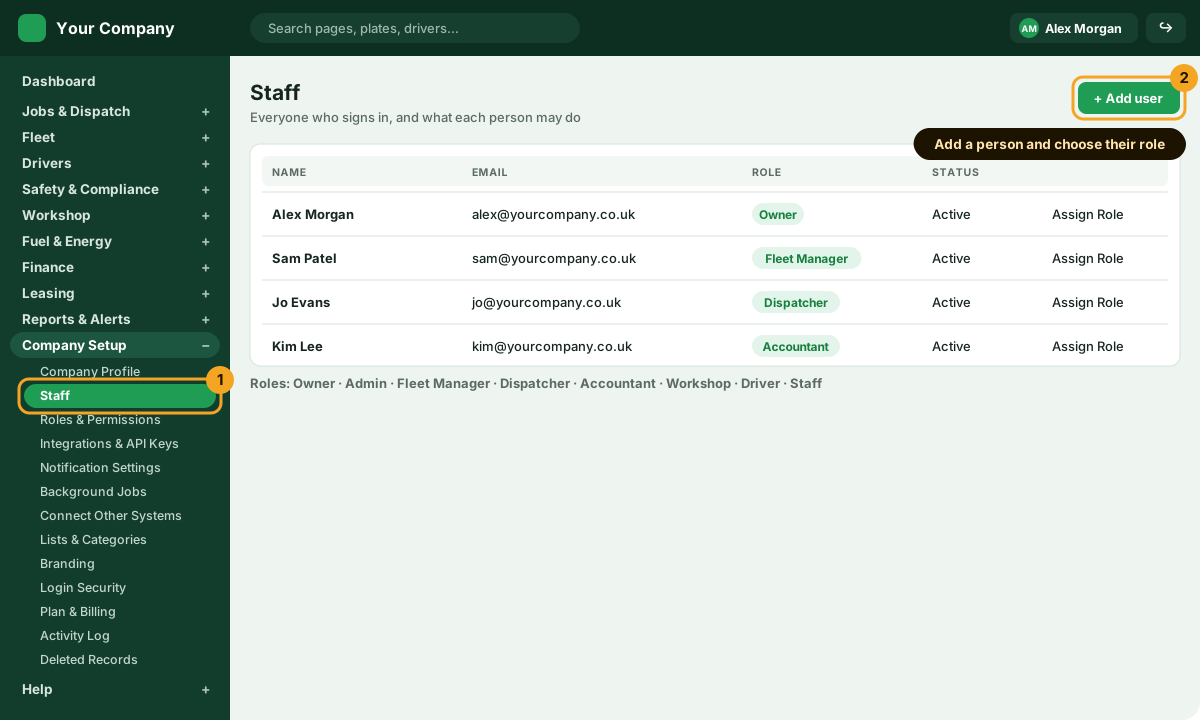
Add each person who will use the CRM in the office or the workshop. Choosing a role fills in sensible permissions for them, so they see what their job needs.
The roles are Owner, Admin, Fleet Manager, Dispatcher, Accountant, Workshop, Driver and Staff.
Press + Add user and enter their name and work email
Choose their role
Use Assign Role, or Roles & Permissions (step 7), to change any single permission
Company Setup, Staff: people with their roles and the Add user buttonBack to the steps7
Step 7 of 22
Choose what each person may do
Company Setup › Roles & Permissions
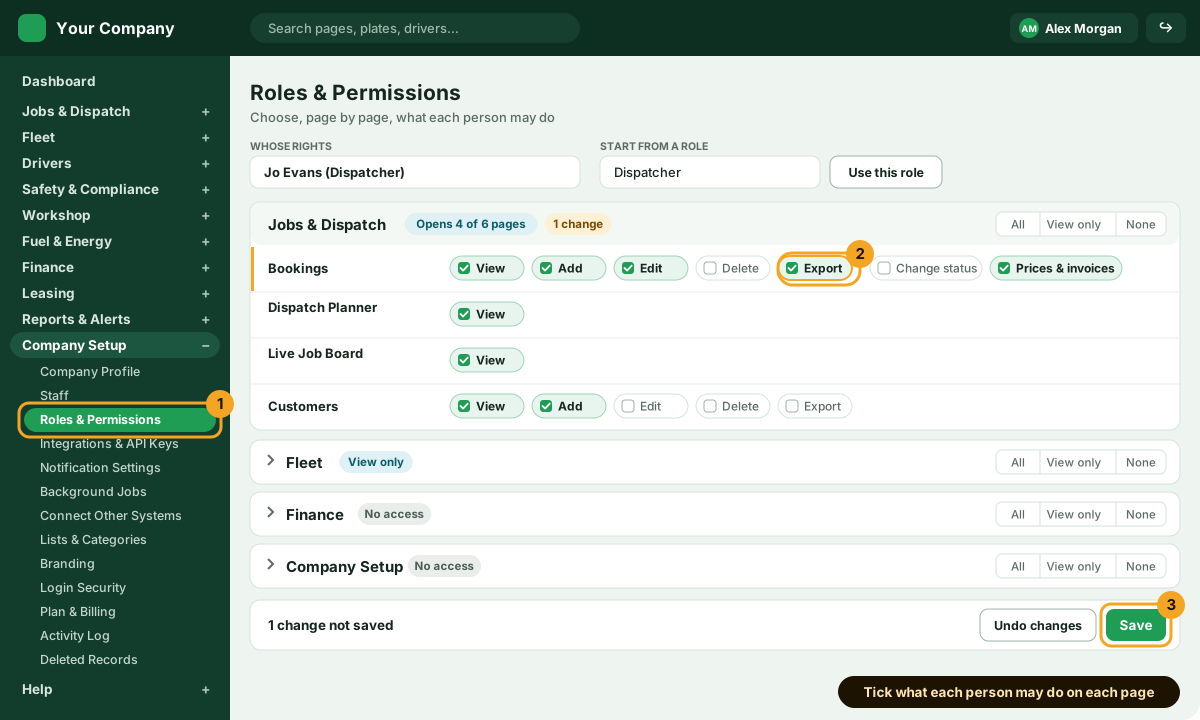
Choose a person and open each menu: every page has its own ticks for View, Add, Edit, Delete and Export (downloading lists to Excel or CSV), plus that page’s own rights, such as Change status on bookings or Mark as fixed on defects. All, View only and None set a whole menu or page at once.
Choose the person, or start from a role
Open a menu and tick what they may do on each page
Save
Company Setup, Roles and Permissions: one person’s rights page by page, with View, Add, Edit, Delete and Export ticksBack to the steps8
Step 8 of 22
Send email from your own address
Company Setup › Integrations & API Keys › Email sending
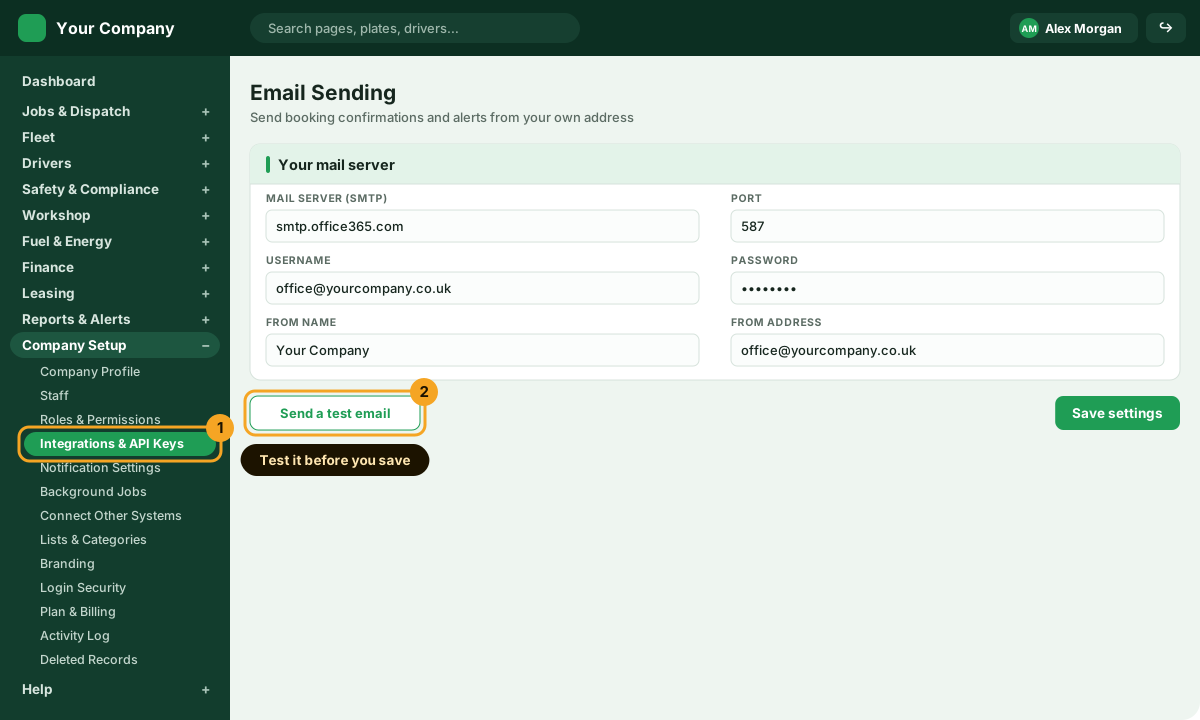
Booking confirmations, password resets and alerts can come from your own email address instead of ours. Ask whoever looks after your email for the mail server details.
Integrations & API Keys has one card for each thing to set up, with whether it is working; press a card to open its settings beside the list.
Press the Email sending card
Enter the mail server, port, username and password
Enter the name and address emails should come from
Press Send a test email, then Save settings
Integrations and API Keys, Email sending: mail server details with Send a test emailBack to the steps9
Step 9 of 22
Choose how you use WhatsApp (optional)
Company Setup › Integrations & API Keys › WhatsApp
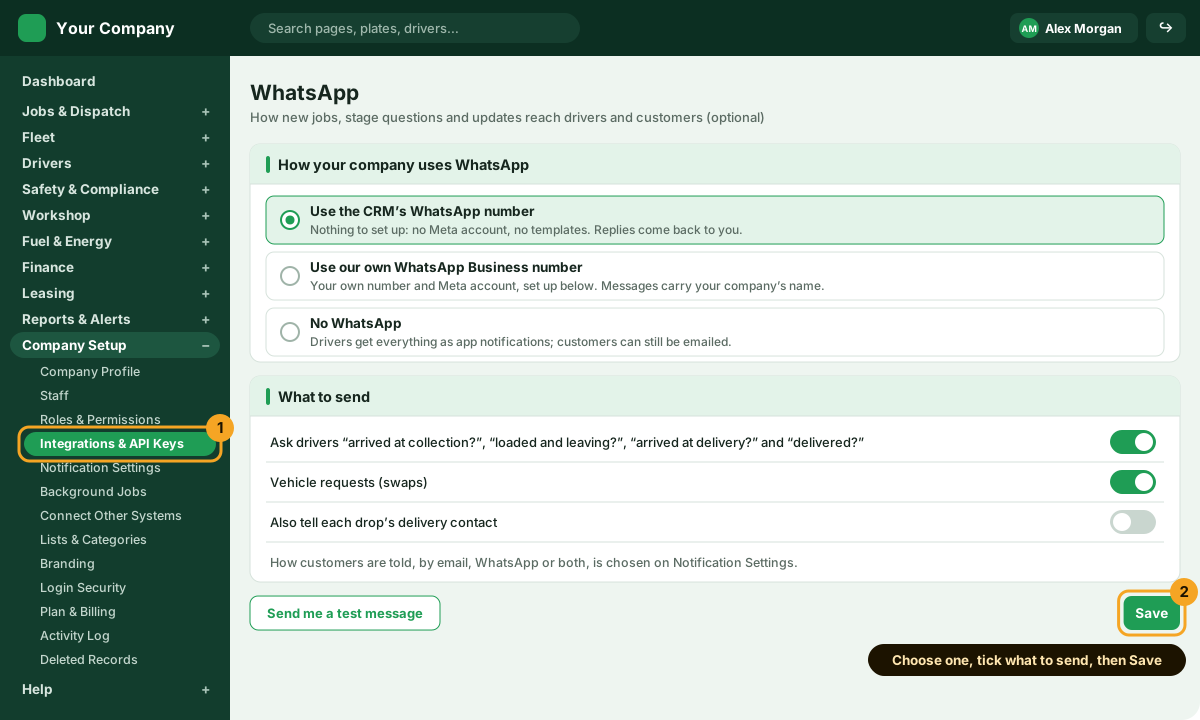
WhatsApp can tell your drivers about new jobs, ask them the stage questions (“Arrived at the collection?”) and keep your customers up to date. Every answer reaches the office as it happens.
Choose one of three ways: use the CRM’s WhatsApp number, with nothing to set up; use your own WhatsApp Business number, which needs a WhatsApp Business account with Meta; or no WhatsApp, so drivers get everything in the driver app.
Use the CRM’s WhatsApp number: nothing to set up, and replies come back to you
Use our own WhatsApp Business number: copy your Meta account’s details into this screen
No WhatsApp: drivers get app notifications, and customers can still be emailed
Then tick what to send, save, and send yourself a test (how customers are told is on Notification Settings)
Integrations and API Keys, WhatsApp: the three choices, the CRM’s number, your own number or no WhatsAppBack to the steps10
Step 10 of 22
Choose how drivers and customers hear from you
Company Setup › Notification Settings
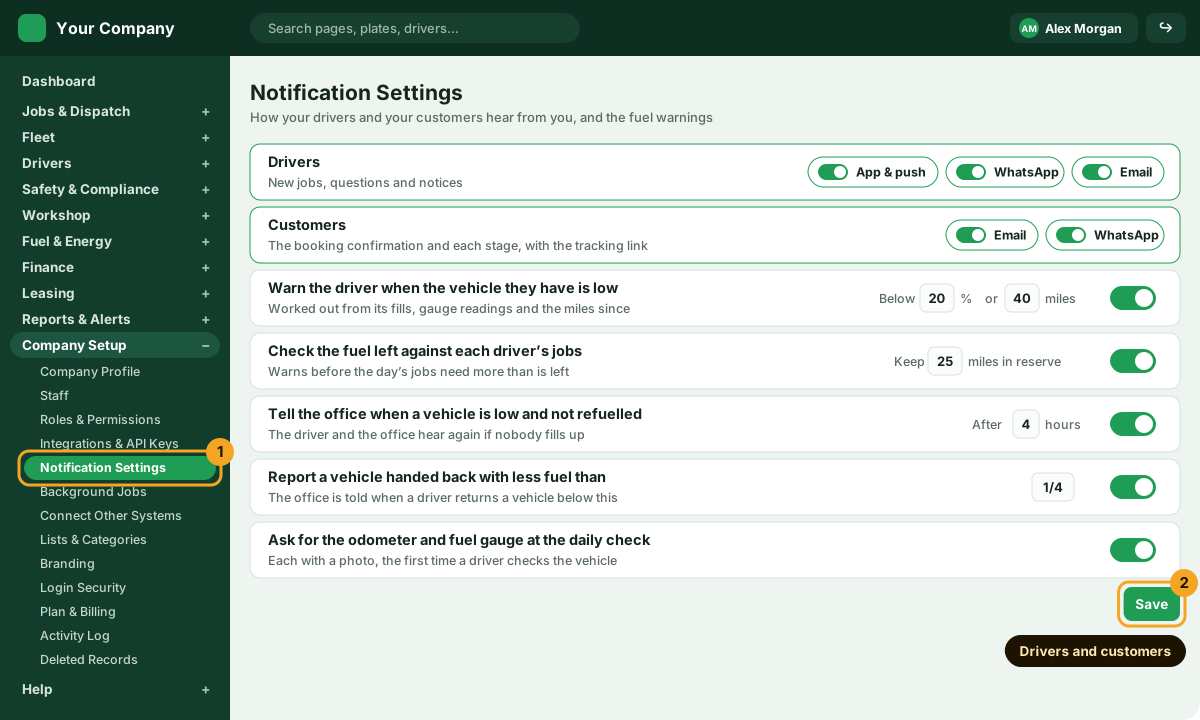
Decide how new jobs, stage questions and notices reach your drivers: in the driver app with a push notification, on WhatsApp, by email, or any of them. With the app and WhatsApp both on, a question sent on WhatsApp also shows in the app, and either answer counts.
Then choose how your customers get their booking confirmation and its updates, with the tracking link: by email, on WhatsApp, or both. The same screen sets the fuel warnings, worked out from each vehicle’s fills, its fuel gauge readings and the miles since.
Drivers: the app and its push, WhatsApp, email
Customers: the booking confirmation and updates by email, WhatsApp, or both
Warn the driver when the vehicle they have is low on fuel
Check the fuel left against each driver’s jobs for the day
Tell the office when a vehicle is low and not refuelled
Report a vehicle handed back with less fuel than you set
Ask for the odometer and fuel gauge at the daily check
Company Setup, Notification Settings: how drivers and customers hear from you, the fuel warnings and the odometer at the daily checkBack to the steps11
Step 11 of 22
Set up maps and address search
Company Setup › Integrations & API Keys › Maps and addresses
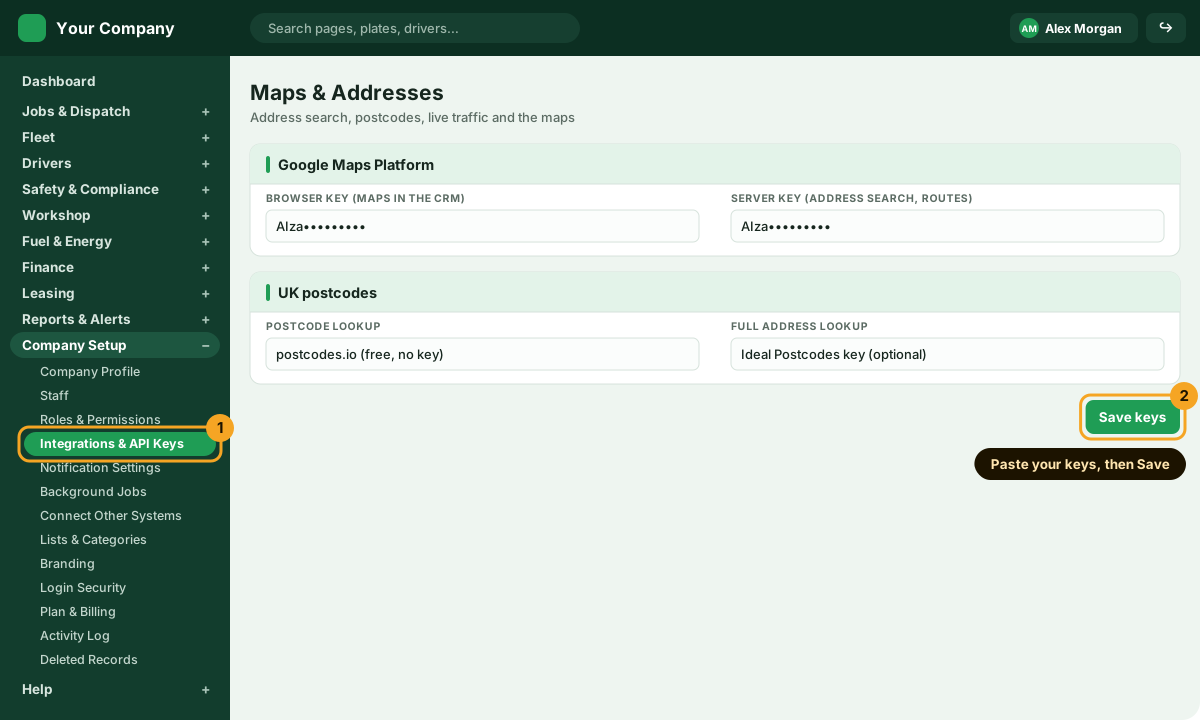
Address search, live traffic, routes and the maps use Google Maps Platform on your own key, so you only pay for what you use. UK postcode lookup works without any key.
Press the Maps and addresses card
Paste a browser key for the maps
Paste a server key for address search, routes and travel times
Optionally add an Ideal Postcodes key for full UK addresses
Integrations and API Keys, Maps and addresses: Google Maps keys and UK postcode lookupBack to the steps12
Step 12 of 22
Choose your tracking and licence checks
Company Setup › Integrations & API Keys › Tracking sources, then Drivers › Licence Checks
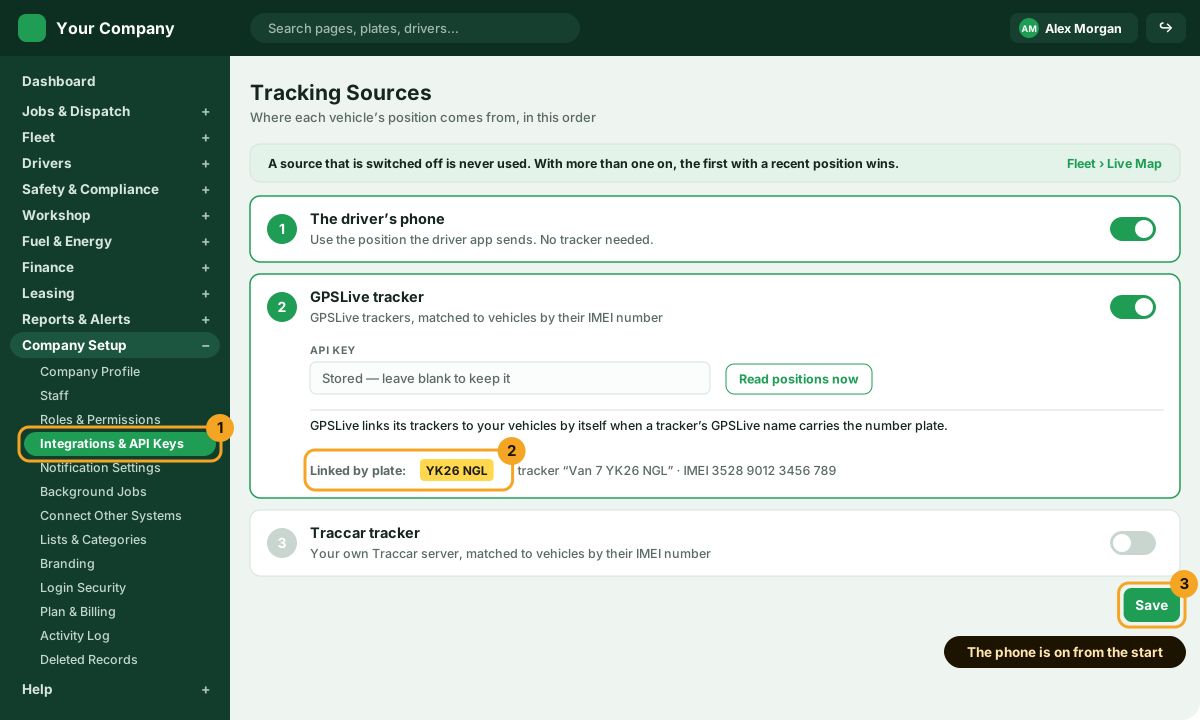
Fleet › Live Map shows each vehicle from up to three sources, in order: the driver’s phone, then GPSLive, then Traccar. The driver’s phone is on from the start, so there is nothing to fit in the vehicles.
A source you switch off is never used. With more than one on, the first with a recent position wins.
Then choose who checks your drivers’ licences on Drivers › Licence Checks: by hand, or automatically with Licence Check (DAVIS) or DVLA on your own contract, always with the driver’s consent.
Leave the driver’s phone on
Switch on GPSLive or Traccar only if you already have their trackers, and enter the account’s key
GPSLive links its trackers to your vehicles by itself when a tracker’s name in GPSLive carries the number plate
Or press Find in GPSLive on a vehicle’s form to fill in its tracker’s IMEI number
On Drivers › Licence Checks, choose by hand, Licence Check (DAVIS) or DVLA, and how often
Integrations and API Keys, Tracking sources: the driver’s phone, GPSLive and Traccar in priority order, with GPSLive linking trackers by number plateBack to the steps13
Step 13 of 22
Add your vehicles
Fleet › Vehicles
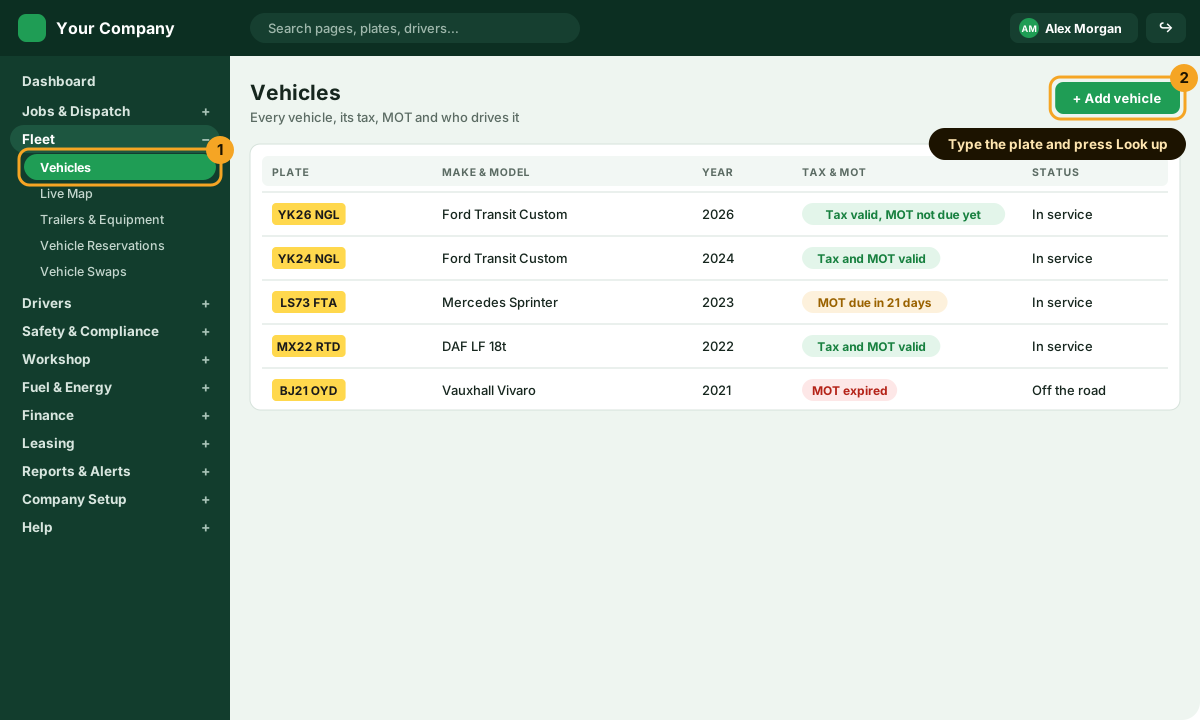
Add each vehicle by its number plate. Press Look up and the CRM fills in the make, model, colour, tax and MOT from DVLA, then keeps the MOT history up to date.
Press + Add vehicle and type the plate
Press Look up and check what it found
Choose its vehicle type, then save: the depot is filled in from its driver, or your only depot
Fleet, Vehicles: the register with plates, tax and MOT status and the Add vehicle buttonBack to the steps14
Step 14 of 22
Add your drivers and give them the app
Drivers › Drivers
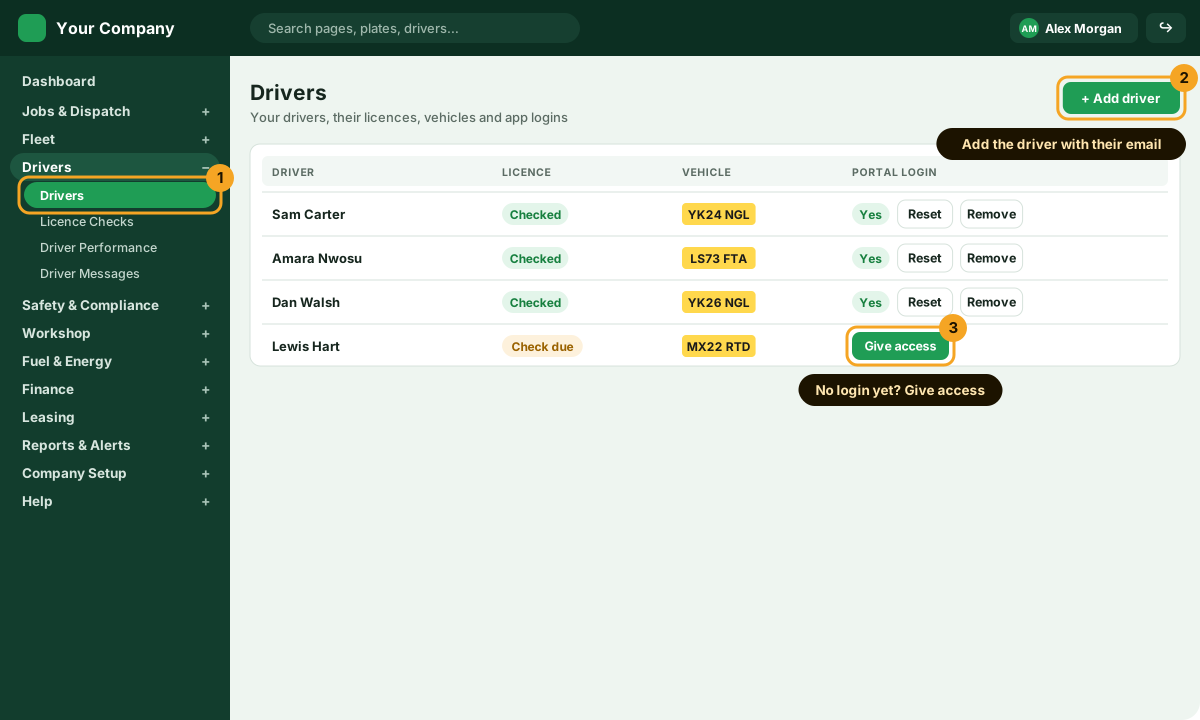
Add each driver with their email address, mobile number, licence number and licence expiry date: the CRM needs all four. The driver gets their own login for the driver app straight away, and the password is emailed to them. They sign in on their own phone and see today’s jobs, new jobs, checks and their vehicle.
Each driver sees only their own work; there are no shared logins. A driver holds one vehicle at a time, and after every hand-over or swap the new driver checks the vehicle before using it.
Press + Add driver and enter their name, email and mobile
Fill in their licence: the number and expiry date, then the categories and photos of the front and back
A driver with no login yet? Press Give access in the Portal login column
Use Reset in the same column to set a new password
Give the driver their vehicle on the vehicle’s page
Drivers, Drivers: drivers with their licence checks, vehicles and app logins, with Give access and ResetBack to the steps15
Step 15 of 22
Set up your walkaround check lists
Safety & Compliance › Check Lists
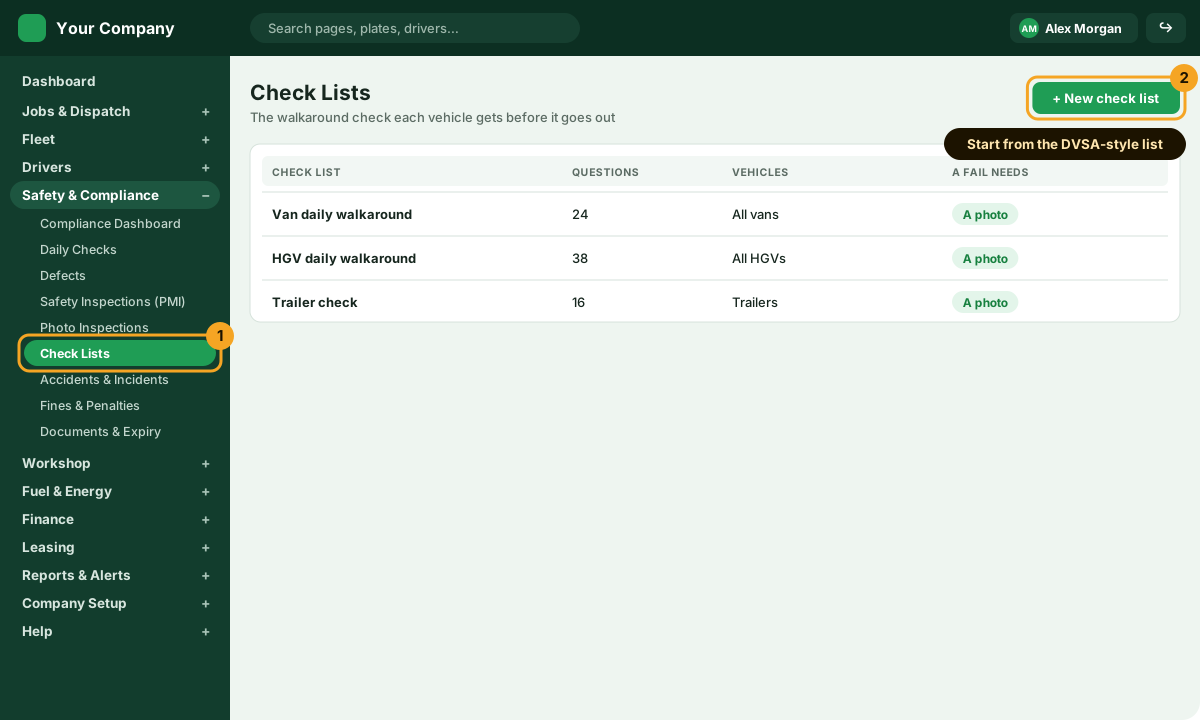
Decide what drivers check on each vehicle before it goes out. Drivers do the check in the app; a fail can need a photo and becomes a defect in the office, and a safety-critical fail keeps the vehicle off the road until it is fixed.
The daily check can also ask for the odometer reading and the fuel gauge, each with a photo (step 10). A check list can also be the questions in a Safety & Compliance › Photo Inspections round, where every driver photographs their vehicle by a date.
Start from the DVSA-style list and add your own questions
Choose which vehicles each list is for
Say which answers need a photo
Safety and Compliance, Check Lists: walkaround check lists with their questions and vehiclesBack to the steps16
Step 16 of 22
Set up your document types
Company Setup › Lists & Categories › Document Types
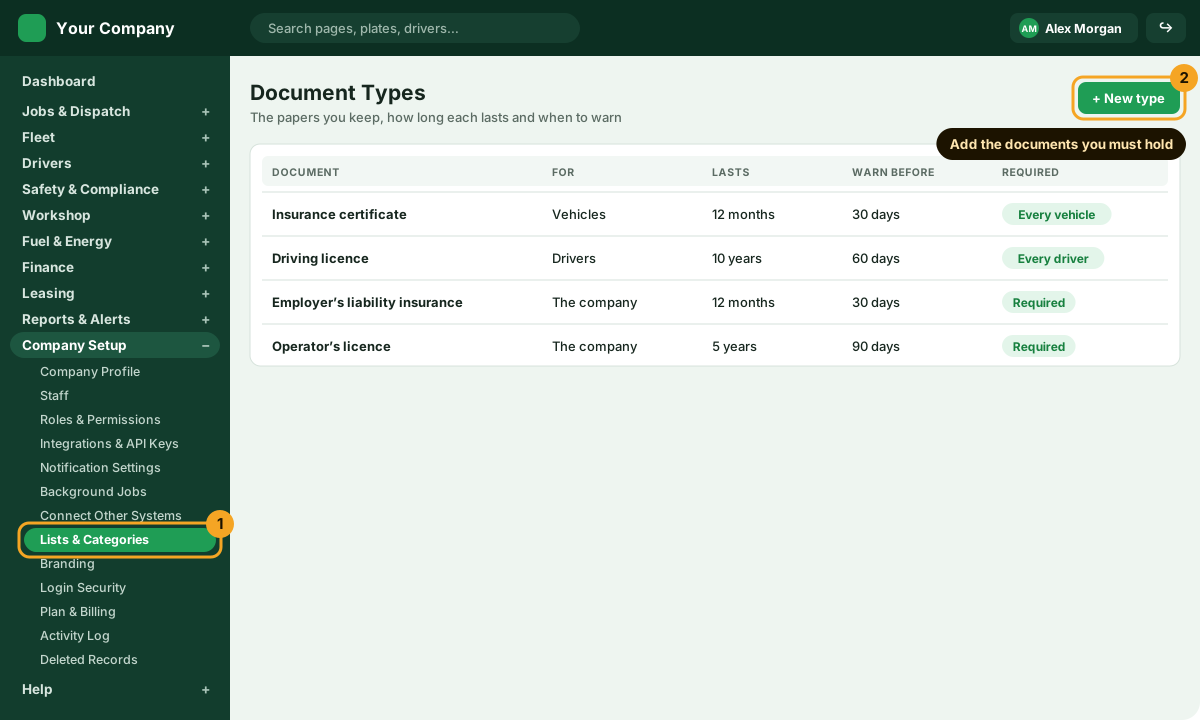
Tell the CRM which papers you keep for vehicles, drivers and the company, how long each one lasts, how early to warn you, and which ones everybody must have. The CRM then shows what is valid, due, expired or missing on Safety & Compliance › Documents & Expiry.
Insurance, MOT and V5C for vehicles
CPC card and tacho card for drivers (the driving licence is kept on each driver’s page)
Employer’s liability insurance and the Operator’s Licence for the company
Lists and Categories, Document Types: vehicle, driver and company document types with how long each lastsBack to the steps17
Step 17 of 22
Add your company’s own documents
Company Setup › Company Profile › Company documents
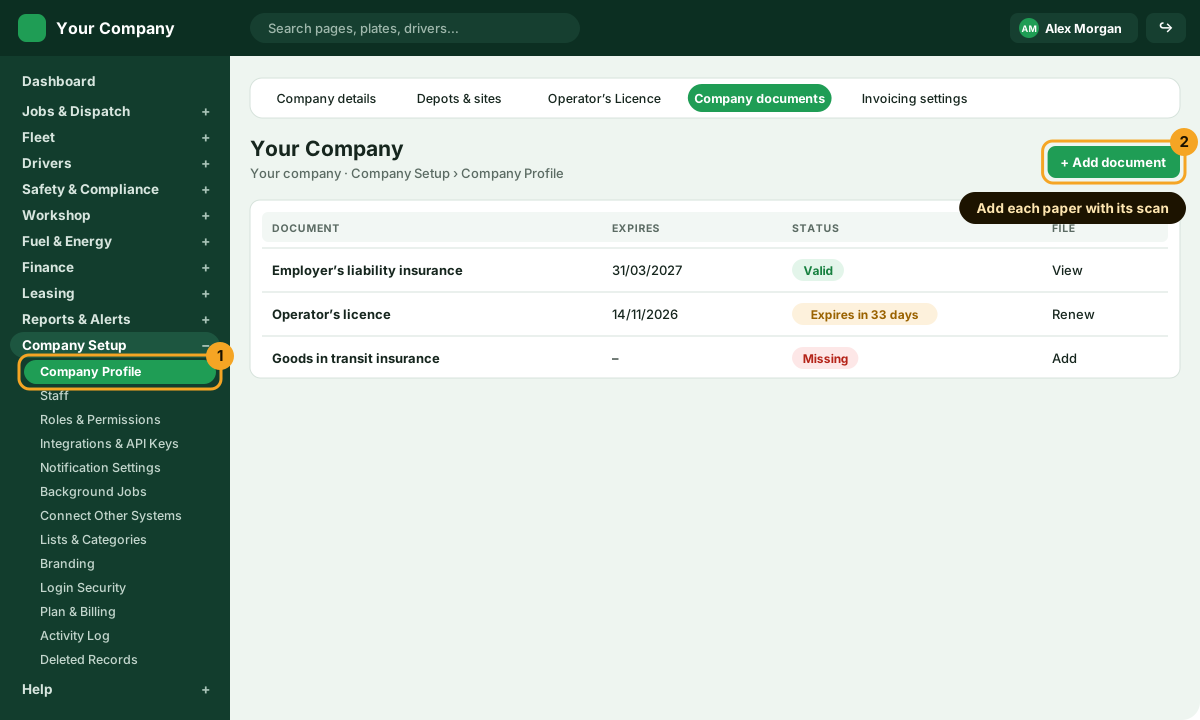
Record your company’s own papers with their dates and a scan: employer’s liability insurance, goods in transit cover, the Operator’s Licence and anything else you set up in step 16.
A required type nobody has recorded shows as Missing with an Add button, and a document that is running out has Renew.
Press + Add document and choose its type
Enter the reference, the issue and expiry dates
Attach the scan: PDF, PNG, JPEG or WEBP
Company Setup, Company Profile, Company documents: company papers with their expiry dates and the Add document buttonBack to the steps18
Step 18 of 22
Add a customer and your first booking
Jobs & Dispatch › Bookings › + New Booking
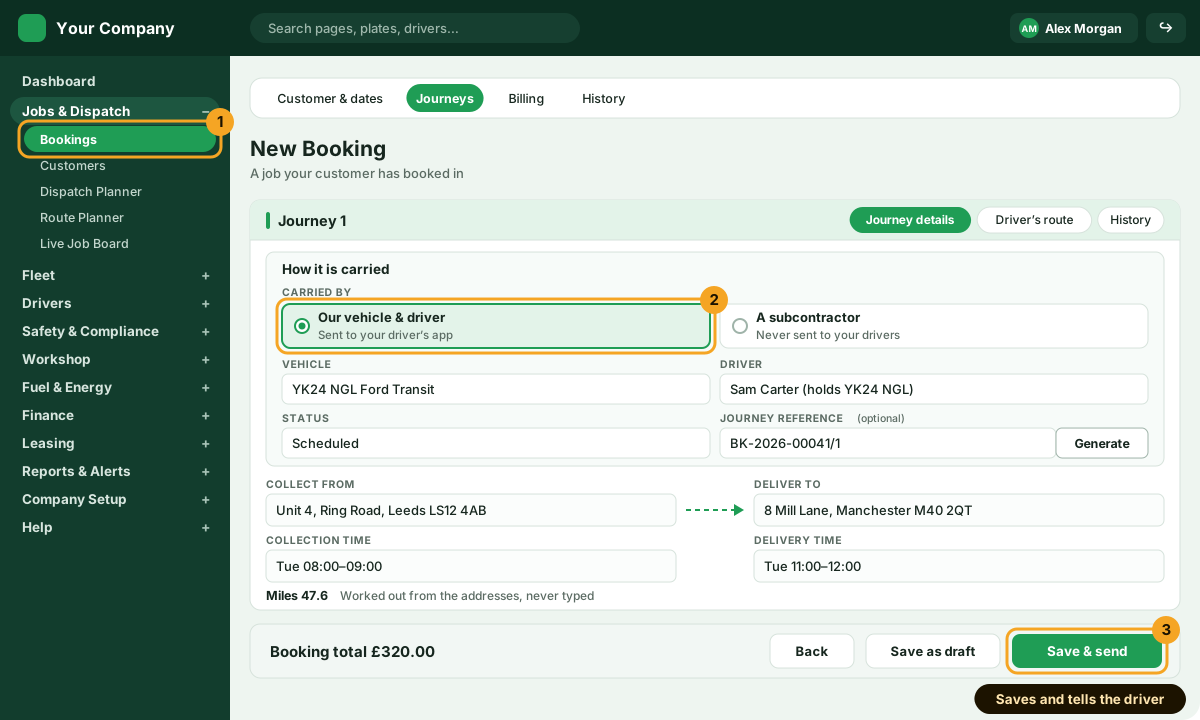
A booking is a job your customer has booked in. Add the customer and the dates, then one journey for a simple collection and delivery, or several for a multi-drop. Every journey has a collection and a delivery, each with its address and time, and its reference (such as BK-2026-00041/1) is filled in for you.
How it is carried is one of two choices: our vehicle and driver, or a subcontractor. A journey given to a subcontractor is never sent to any of your drivers. The miles are worked out from the addresses, never typed. The vehicle must be the one its driver holds, and a driver or vehicle already on another job at the same time is refused, so nothing is double-booked.
Customer & dates: choose the customer, or add them on Jobs & Dispatch › Customers, and the booking window
Journeys: how it is carried (Our vehicle & driver, or A subcontractor), then the collection and delivery addresses and times
Press Save & send to tell each driver about the job: every journey on your own fleet then needs its vehicle and driver
Or press Save as draft to finish later: a draft may wait without a vehicle or driver, and nothing is sent
On a saved journey, the Driver’s route tab lets you choose the roads and send them to the driver’s app
Jobs and Dispatch, Bookings, New Booking: a journey carried by our vehicle and driver, its reference filled in, the addresses and times, and Save and sendBack to the steps19
Step 19 of 22
Follow the work on the Live Job Board
Jobs & Dispatch › Live Job Board
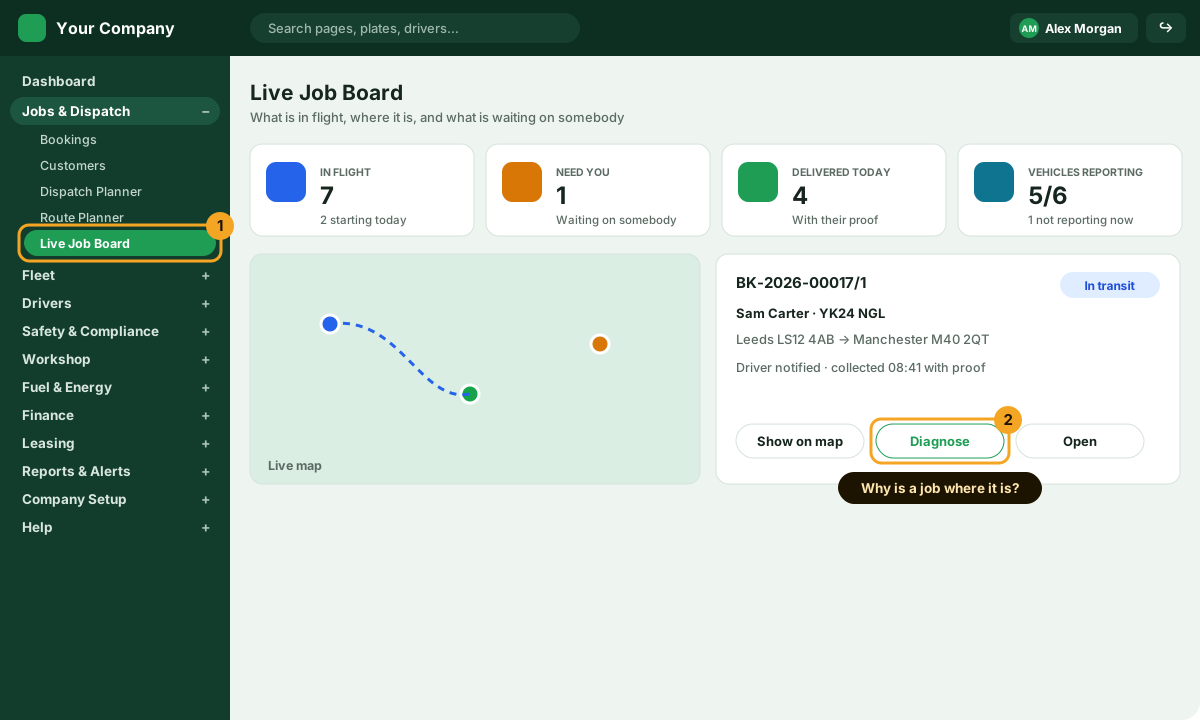
The Live Job Board shows what is in flight, where each vehicle is and what is waiting on somebody. The cards at the top give the day at a glance, and each job card has Show on map, Diagnose and Open.
Diagnose explains why a job is where it is: what it is waiting for, how far the vehicle is from its next stop, and what to do.
In flight, Need you, Delivered today and Vehicles reporting at a glance
Press a job to see only its vehicle and stops on the map
Press Diagnose when a job seems stuck
Jobs and Dispatch, Live Job Board: summary cards, the live map and a job card with Show on map, Diagnose and OpenBack to the steps20
Step 20 of 22
See your fleet on the Live Map
Fleet › Live Map
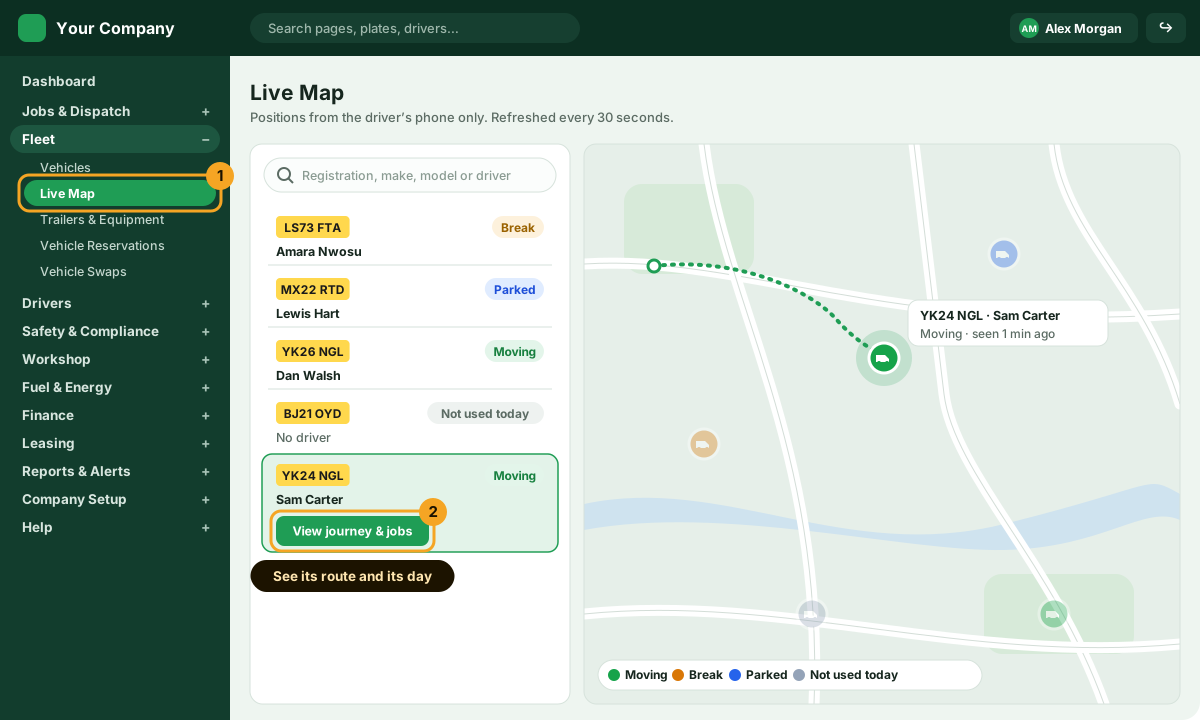
The Live Map shows where every vehicle is now, from the sources you chose in step 12. Search for a vehicle by its plate, make, model or driver to see it on its own.
Each vehicle shows whether it is moving, on a break, parked or not used today. Press View journey & jobs to see its route today and what it did: stops, checks, journeys, fuel fills, defects and hand-overs.
Type a plate or a driver’s name in the search
Press a vehicle to bring it into focus on the map
Press View journey & jobs for its day
Fleet, Live Map: the vehicle list with search, the map with vehicle icons, and one vehicle in focusBack to the steps21
Step 21 of 22
Set up invoicing and your accounts
Company Setup › Company Profile › Invoicing settings, then Finance
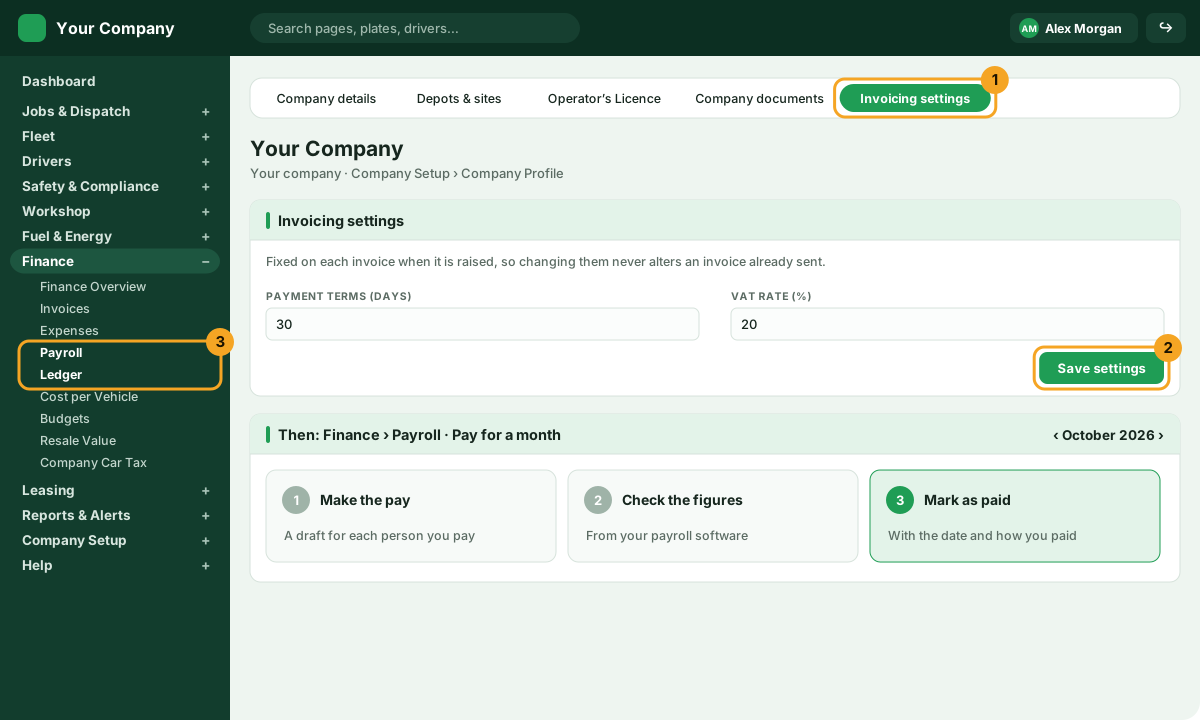
Set how long your customers have to pay and your VAT rate on the Invoicing settings tab of your Company Profile. Both are fixed on each invoice when it is raised, so changing them later never alters an invoice already sent.
Finance then shows what customers owe, the payments received, your expenses and everything paid out. Payroll records your drivers’ and staff’s pay month by month, and the Ledger lists every payment in and out with a running balance.
Enter your payment terms in days and your VAT rate
Group your costs under your own headings on Company Setup › Lists & Categories › Expense Categories
Record payments as they arrive on Finance › Invoices
On Payroll, add who you pay, then make, check and mark each month’s pay as paid
Download the Ledger for your accountant as Excel or CSV
Company Setup, Company Profile, Invoicing settings: payment terms and VAT rate, beside the Finance menu with Payroll and LedgerBack to the steps22
Step 22 of 22
Add your leases (optional)
Leasing › Leases
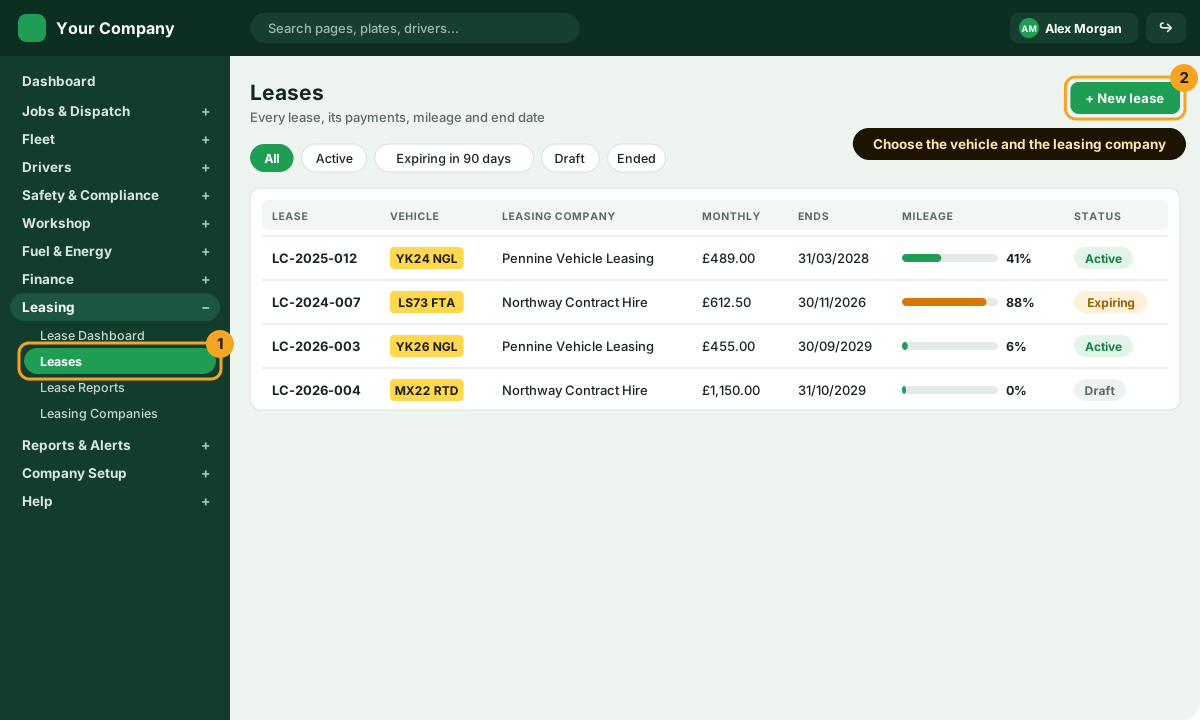
If you lease or contract-hire vehicles, record each agreement: the leasing company, the vehicle, the dates, the monthly rental and the mileage allowance. The CRM builds the payment schedule, follows the mileage from the vehicle’s odometer, and warns you before each lease ends or runs over its miles.
Press + New lease and choose the vehicle and the leasing company
Enter the dates, the monthly rental, the deposit and the allowed mileage
Save: the payment schedule is made for you
At the end, use Return & renewal to hand the vehicle back, buy it or renew
Leasing, Leases: leases with their vehicles, leasing companies, monthly rentals, end dates and mileageBack to the steps
Questions about setting up
Stuck on a step? Contact us or book a demo and we will set it up with you.
No. Steps 1 to 7, 13, 14 and 18 are the essentials. Email sending, WhatsApp, maps keys, trackers, licence checks and leases are optional and can be added whenever you are ready; until then the CRM uses its own email and the drivers’ phones for positions.
Yes. The first time the owner of a new company opens the dashboard, the Setup Guide opens by itself: eleven steps from your company details to your invoice terms, each saying why it matters and opening the screens it needs beside the list. Each step ticks itself off from what you have saved, a step can be skipped, and the dashboard shows how many are done. Find it again under Help › Setup Guide.
Yes. Everything on Company Setup › Company Profile, including the time zone and the logo, can be changed at any time by the owner or an admin.
Every date and time in the CRM, the driver app, the messages and the exports is shown on your company’s clock. It is chosen at sign-up from your browser and can be changed on Company Setup › Company Profile.
The company owner, and the people the owner or an admin gives the rights to. Roles fill in sensible permissions, and Company Setup › Roles & Permissions lets you change any of them for one person, page by page.
No. The driver app shares the position of the vehicle each driver holds. If you already use Traccar or GPSLive trackers, switch them on under Company Setup › Integrations & API Keys › Tracking sources; a source you switch off is never used. Fleet › Live Map shows where every vehicle is.
No. Drivers use the driver app on their own phone with the login the office gives them. New jobs, questions and proof photos all happen there, or on WhatsApp if you switch it on.
Every booking shows a driver score out of 100 (20 points each for arriving at the collection, the collection proof, arriving at the delivery, the delivery proof and delivering on time), and each journey’s History lists every step with the points earned and a Missed by driver badge on any step that was skipped. Drivers › Driver Performance shows each driver over time.
On Company Setup › Company Profile › Company documents, using the document types you set up in Company Setup › Lists & Categories › Document Types. The CRM warns you before each one runs out.
Ready to set up your company?
Start a free trial with no card, or book a demo and we will walk through the set-up with you.
We use necessary cookies to make the site work. With your permission we also use analytics cookies to see which pages help people. You can change your mind at any time. Cookie policy